Create a Single User
- Log into your platform as the admin.
- Access the Admin panel.
- Click Organization from the left pane menu and then select the Users tab.
- Click
to add a single user and enter the user details. Note that names are case-sensitive.
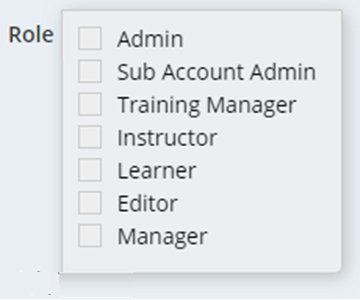
- Select one or more Assignable Roles. If the user requires a Training Manager or Admin role, toggle those on as well.
- Click Create.

Click on the video to maximize.
Update Username
Activate or Deactivate a User
You can change any user's status from Active to Inactive. When inactive, the user cannot log in.
When a Learner is inactivated, the following behavior occurs:
- Instructors receive a notification that the learner has been suspended
- On the Leaderboard, the learner's name doesn't appear. Note that if the learner is reactivated, the system recalculates the learner's performance, and his or her name is displayed again.
- An indicator appears on instructor reports that the learner is suspended.
- The instructor cannot send messages to an inactive learner.
Filter to Find Users
User details appear on the Organization tab. You can enter the search string to find the user or filter by role category.
Assign Courses or Groups to Users
You can add a user to courses either as a learner or instructor or to organizational groups.
- Click the
Groups icon.
- In the related pane, select the appropriate Group tab and specify the relevant courses and/or groups. When done, click Save and Exit.

Click on the video to maximize.
Delete Users
You can delete users by clicking on the  . After removing the user, that user can no longer log in to the platform. Also, any related reports do not include the user's name or reflect their performance and progress data.