Courses that involve synchronous training, such as a lesson or workshop, sometimes require reserving tangible resources for that training. A resource could be a classroom, equipment such as projectors, VR goggles, any type of training aid, and external instructors.
How does it work?
This article covers the following topics:
Administrators manage the pool of available resources in the organization. This list of named resources may be updated at any time via the Admin interface by uploading an Excel file with the list of resources and their relevant attributes.
Instructors may reserve one or more training resources for Scheduled Events in their courses. See this article on how Instructors can use training resources.
Managing your organization's pool of training resources
As an Administrator, you can manage the pool of named resources that are available for instructors to reserve in their training events in courses. This pool is managed by importing an Excel file with the list of new resources to add ad/or existing resources to update.
Download Training Resources Excel template
In the Admin interface, select Organization in the side menu on the left, and click the Resources tab. Click on the down arrow icon ⬇ to download an empty Excel file:

Open the Excel file:

NOTE
If your account already has training resources that have been uploaded previously, they will appear in the downloaded Excel file. This is normal and allows you to update any attribute of these resources (including changing their status from active to inactive).
Resource Attributes
Training resources have the following attributes:
- Resource ID: Every resource must have a unique alphanumeric identifier.
- Resource Name: Give the resource a meaningful name.
- Resource Description(optional): The description may give instructors using this resource some additional information or guidelines that concern the use of the resource.
- Resource Type: Resource types group the resources according to their purpose or nature (e.g., Training Aid, Classroom, Projector, External Instructor, etc.). Bear in mind that instructors are first requested to select the Resource Type, and only they will be presented with the list of available resources of that type.
- Cost per Hour(optional): The cost will be visible as additional information to instructors when selecting this resource. Accumulated costs of use of different resources will serve for aggregated reports.
- Active/Inactive: Set this attribute to "Active" to make a resource available for instructors to assign to new events, "Inactive" to hide it from instructors when they select resources for new events.
Adding, updating, and removing training resources
Managing your organization's pool of training resources is done by exporting and importing the Excel file of resources.
Adding new resources:
Click the up button ⬆ and upload your Excel file with the relevant resource attributes (using the exact same structure as in the template Excel downloaded from the system - as explained above).

Here's an example of a resources file ready to be uploaded to the system:

Updating existing resources:
To update one or more existing resources, simply modify their relevant attributes and upload the updated Excel file. Make sure to keep the same Resource ID, which is your unique identifier for making changes to that resource - this is how the system understands which resource you intend to modify.
Removing resources:
If you wish to make one or more resources unavailable for instructors, simply modify their status from Active to Inactive. The inactive resource will not be shown to instructors when they search for resources to assign to their training events.
File uploads
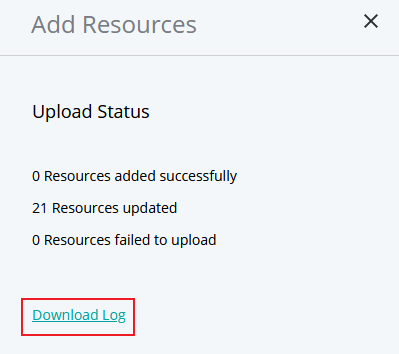
When uploading your Excel file, pay attention to the results of your upload in the Add Resources side panel, listing:
- Number of resources that were added successfully.
- Number of resources that were updated.
- Number of resources that failed to upload.
In case any resources fail to upload, it is advisable to click Download Log and open the log file to see the failure reason or send it to Technical Support: